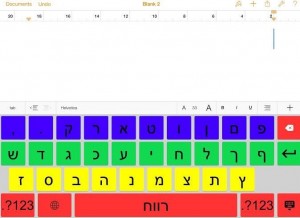
IssieBoard is a new app that came out of the very fruitful collaboration between The Technology Consulting Center of Beit Issie Shapiro and SAP Labs Israel.
Typing on a virtual keyboard can be challenging for many users and therefore when given the opportunity, we decided to develop a virtual keyboard app that allows the user to customize a variety of visual aspects of the keyboard. The keyboard can be very useful for children and adults with learning difficulties, visual impairments, motor impairments, cognitive impairments, and even users who are just beginning to learn to type. After setting the keyboard up it can be used in any app on the iPad that requires typing, by switching between keyboards using the globe key located next to the Space Bar.
After downloading the app, the keyboard has to be added to the device’s keyboards in Settings. (Settings – General – Keyboards – Add New Keyboard – IssieBoard)
Once in the app, the settings can be accessed and customized for the user according to the following characteristics:
1) Key Color, Letter Color, Keyboard Background Color
2) Key Color, Letter Color, Keyboard background Color by Section (Left-Middle-Right) or by Row

3) Coloring specific letters
4) Choosing specific letters to appear on the keyboard (All others will disappear. Useful for practicing typing of target words)
There are a variety of colors to choose from maximizing the customization for each user.
Settings Instructions
Customization of the keyboard is done through the app. Once open you will see a screen like this:
The Instructions are currently in Hebrew. Following are clear instructions to manage the settings.
On the left is the settings menu. On the right you see a blank white space with two headings at the top. The left heading says “Show Keyboard” and the right heading says “Hide Keyboard” These two buttons will allow you to preview what your keyboard will look like while trying out different color settings.
Settings Tool Bar (on the left):
Setting main colors (הגדרות ראשיות):
The first section of the settings bar on the left allows you to choose keyboard colors. The first three tabs are as follows:
1) Keyboard background color
2) Key color
3) Letter color
You may press הצג מקלדת, the left blue button on the preview screen, at any time to see what your keyboard looks like. Press on הסתר מקלדת, the right blue button, to hide it again.
מקשים נראים
Moving down the settings the tool bar, the next setting is a tab labelled מקשים נראים. This setting allows you to choose only specific letters to appear on the keyboard. Simply type the letters you want in the window under the blue buttons. A setting that is useful when practicing the typing of specific words.
In order to return to the full keyboard you need to enter this setting again and erase the letters you typed in the window.
Dividing the keyboard into sections:
The keyboard can also be divided into sections, by row or by left-middle-right, and each section can be given its own color.
Press on the settings tab שורות/עמודות and you will see this screen
There are now two new buttons on the preview screen. The left button allows you to set colors by rows and the right button by sections. Back on the tool bar you can now choose the color of the keys and of the text of each row or section. ימינה/למעלה corresponds to right/upper (section or row), אמצע corresponds to middle (section or row), and שמאלה/למטה corresponds to left/bottom (section or row).
Here are examples of what that may look like.
הגדרת מקשים מיוחדים
Moving down the tool bar, the next settings tab is הגדרת מקשים מיוחדים. This setting allows you to have certain letters on the keyboard to be a different color, to stand out from the rest of the letters. When you press on this tab a window appears in the preview screen. Type the letters you want to highlight in this window.
This could be helpful, for example, when learning to type new words, or to highlight the special letters that come at the end of words. Another example, could be to highlight the letters ו (vav) and י (yod) which tend to look very similar and may confuse a new learner.
Using the example above, the keyboard will look like this:
Templates (תבניות)
The app includes two pre-made templates to choose from under the תבניות tab in the settings tool bar.
Template 1
Template 2
Additional Settings (הגדרות נוספות)
The next ta down in the settings tool bar is הגדרות נוספות which allows for additional settings such as choosing specific colors for the backspace, enter and space bar keys.
Once you have customized your keyboard, leave the app and go to any app on the iPad that requires typing. To choose your customized IssieBoard simply press on the globe key beside the space bar to toggle between keyboards and choose IssieBoard.
Good Luck! And be sure to tell us of your experiences or any questions that you may have!


Leave a Reply